We have enabled our customers more control over their data and can now add/ remove, either one by one or in bulk, new members to the Prosper EX platform seamlessly.
We want to ensure that your experience with Prosper EX remains seamless and efficient. As part of our service commitment, we have enabled all our valued customers access to upload employee CSVs through their Prosper EX portal.
Please open the CSV template provided by selecting ‘People & Skills Finder’ / ‘Add employee’ and choosing either the template or downloading your current CSV.

With the CSV open in Excel follow the below. If using the template be sure to delete the three examples before uploading.
A & B: Name fields: Enter first and second name in column A and B accordingly

C: Email field – Critical, if this field is left blank the employee will not upload. This email will appear within the employees’ profile and will be used for all notifications. This is the users login and must be unique. Enter email in column C

D: Phone number field – Enter phone number in column D including Int dial code. This phone number will appear within the employees profile and can be used for notifications. Enter phone number in column D

E: Job role field. Enter job role in column E

F: Profile field (optional). This field will populate the employees’ ‘Profile’ space

G: Team field. Management rights are defined using the Team and or Location fields. Enter employees’ team/ project or department in column G

H: Location field. Management rights are defined using the Team and or Location fields. Enter employees’ location/ project or department in column H

I : Company start date field. Date format must be UK format DD/MM/YYYY. Enter employees’ company start date in column

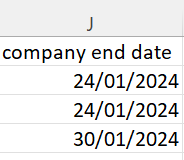
J: Company end date field. Used for automation of Exit surveys. Date format must be UK format DD/MM/YYYY. Enter employees’ company start date in column

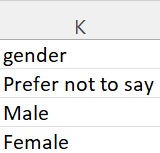
K: Gender field. Enter employees’ gender in column J. Options include male/female/prefer not to say

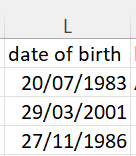
L: Date of birth field. Date format must be UK format DD/MM/YYYY. Enter employees’ date of birth in column K

M: Business unit field (not required). Only required if set up as a franchise. Enter business unit in column L or leave blank

N: Role field. This is Prosper EX access privileges. Enter the intended user role in column M to confirm access privileges.
-
- Admins will have overarching rights to make changes within the platform, create and send surveys, send kudos, and will have visibility of all platform and functionality.
-
- Managers have the ability to view data for, and schedule and conduct 1-to-1’s with their team only, and send kudos.
-
- Employees can log in to take part in surveys, take part in 1-to-1’s, and send kudos to their teammates.

O: Managed teams field. For mapping managers to the employees’ team allocation, please enter the team name/s this manager will have access to in column N

P: Managed locations field. For mapping managers to the employees’ location, please enter the location name/s this manager will have access to in column O

We appreciate your collaboration and thank you for choosing Prosper EX for your needs. If you have any questions or require further assistance, please don’t hesitate to reach out to your Customer Success Manager or our support team.
See upload users to Prosper EX for upload guidelines
